In an effort to facilitate faculty teaching and ownership of intellectual property of both faculty and students, DigLibArts has started to offer WordPress Templates for course sites. This allows faculty, but also students, to install WordPress sites with a single-click. At the moment we currently have two templates available for one-click installation: Course Blogs, and Portfolio Sites. The sites provide a suggested framework with installed plug-ins to aid functionality. They are completely customizable, and they are offered to help you in installing and designing sites for your courses. The Portfolio site is designed both for faculty members to customize to create professional academic sites to feature publications, research, and teaching, and can also be assigned for students to create and curate digital identities and to teach digital literacies.
In the future, depending on demand, we hope to roll out additional sites including Art Portfolio sites, Lab Course Sites, and others. Please feel free to send us recommendations and requests!
Contents:
- Installation
- Template Pages Included in Your Installation
- Recommended Plug-Ins
- In the Works
- Troubleshooting and Assistance
Installation:
- From your Whittier.Domains dashboard, scroll down to the “Applications” box and click on the WordPress button.

- This will take you to the Installatron page where you install any applications to your domain. Click “Install this application” in the upper right hand corner of the window.

- On the next page, first choose a location for your new site. If you created a subdomain for the course (these must be created before installing), you can click on the “Domain” menu and choose the subdomain from the options. Otherwise you can choose your main domain and create a new location in the “Directory” box underneath “Domain”. For example, for my Introduction to Media Studies course, I could use a subdomain, which might look something like, “http://introtomedia.anitaconchita.org/” or I could create a sub directory of my main domain (http://anitaconchita.org) that looks like “http://anitaconchita.org/introtomedia/”. Either will work. It is really a matter of preference and consistency with how you organize your domain.
 One thing to be careful of is to change the default of “blog”, otherwise you’ll have multiple sites installed there and only one will be viewable.
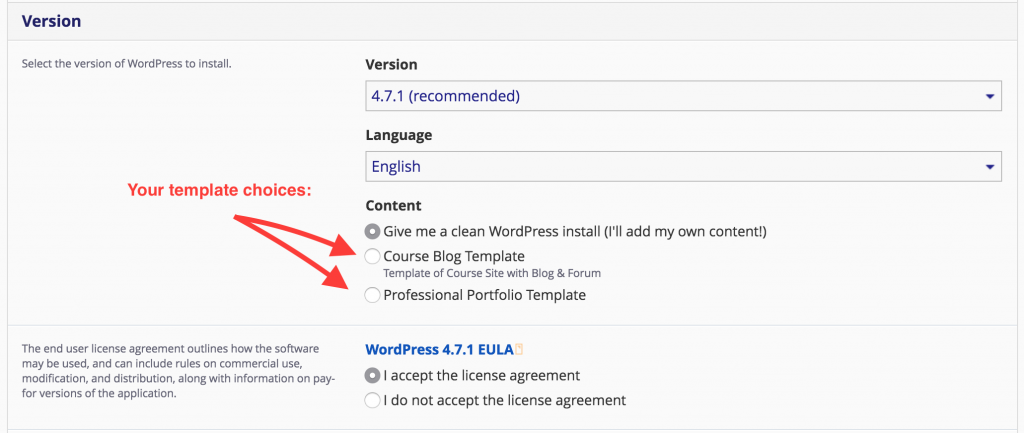
 - The next step is the most important. Under the “Version” section, choose the template you want to install. At the moment there are only 2 choices. If you do not choose a template, Installatron will automatically install a clean default WordPress blog.

- Next make your choices for automatic updates and backups. We recommend auto backups in case something goes wrong with your site, and get in the habit of checking in and backing them up manually as well.
- Under “Settings” reset your administrator username and password for yourself. The Electronic Frontier Foundation has recommendations for how (and why) to create secure passwords. You can also change the name of the site and tagline here. These can always be edited in WordPress later on.
- Then scroll down and click “+Install”. Voila! You’re done. In a few minutes your new site will be live and ready to edit.
Once you are happy with your site, you can add a link to it on your Moodle.
Template Pages Included in your Installation:
Each template has ready-made pages with Lorem Ipsum text that can be easily edited to suit your needs. Any page or plug-in can be disabled or hidden.
For Course Blogs:
- About (course description)
- Syllabus
- Policies
- Schedule
- Assignments
- Instructor Information
- Blog/Announcements
- Forums
For Portfolio Sites:
- About (Biographical information)
- Blog
- Resume
- Contact (with Ninja Form)
Recommended plug-ins:
- Akismet (WordPress.com account required)
- Asgaros Forums
- Ninja Forms
In the works:
We’re working on finding ways to make these course blogs easier for faculty and students, including enabling single-sign on with our campus LDAP or CAS connections. This will allow faculty and students to sign into individual course sites with the My.Whittier log-in, and make it simpler for faculty to enroll students into course sites. More announcements to come!
Troubleshooting and assistance:
If you ever have any questions or need assistance, feel free to reach out to Anne Cong-Huyen, the Digital Scholar.